

Many are unaware of how much personal information may linger online, on social media platforms, or within the databases of data broker sites that collect information, making it a treasure trove for those with malicious intent.
Taking steps to protect your data involves more than just adjusting privacy settings or deactivating profiles; it requires a concerted effort to remove your personal information online.
This article will guide you through how to cleanse your online presence, including how to remove your information from data brokers, delete unused apps, secure your email account, and ensure your personally identifiable information is removed from the internet.
Here are the steps you can take to delete old accounts and remove your data from the internet to ensure your personal details are protected effectively.
12 Steps to Remove Your Information from the Internet
Step 1: Audit Your Digital Presence
Step 2: Secure Your Online Accounts
Step 3: Clean Up No Longer Used Apps and Accounts
Step 4: Remove Personal Data from Search Engines
Step 5: Opt-Out of Data Broker Lists
Step 6: Delete or Secure Social Media Accounts
Step 7: Request Personal Information Removal from Third-Party Websites
Step 8: Handle Identifiable Images and Maps
Step 9: Manage Your Email Accounts
Step 10: Optimize Browser Privacy Settings
Step 1: Audit Your Digital Presence
Online Privacy Threats
Identity Theft: This occurs when someone steals your personal information from public records to commit fraud or other crimes, often leading to financial loss and emotional stress.
Rampant Data Collection: Companies and websites continuously collect and share vast amounts of personal information, sometimes without explicit consent, raising concerns about privacy and how this sensitive data is used or shared.
Remove outdated information: Regularly request data brokers to delete obsolete or incorrect details to minimize privacy risks.
Important information: Understand which pieces of your data are most sensitive and prioritize their protection, especially payment and contact details.
Use Search Engines


Start by typing your name into several search sites, not just in Google Chrome. Include your personal info like nicknames, previous names (such as maiden names), and common misspellings. This broad approach ensures you capture as much information as possible.
Don’t stop at the first page of search results. Information online about you could be buried deep, so dig through at least the first five pages. Look for any links or references to your personal details, including social media profiles, forum posts, or news articles.
List All Accounts and Apps
Begin by recalling all the accounts you’ve created over the years. This includes social media platforms, email accounts, shopping sites, forums, and any service requiring a sign-up. Don’t overlook seemingly insignificant accounts; they often have more information about you than you might remember.
To ensure you haven’t missed anything, consider using a tool like AccountKiller or JustDelete.me. These services offer databases of direct links to delete your accounts from various websites, and browsing through them can jog your memory about old accounts you may have forgotten.
As you compile your list, categorize the accounts based on their type (e.g., social media, shopping, forums) and priority for deletion or security enhancement. This organization will help streamline the next steps in securing your digital presence.
Step 2: Secure Your Online Accounts
Update Your Security Settings
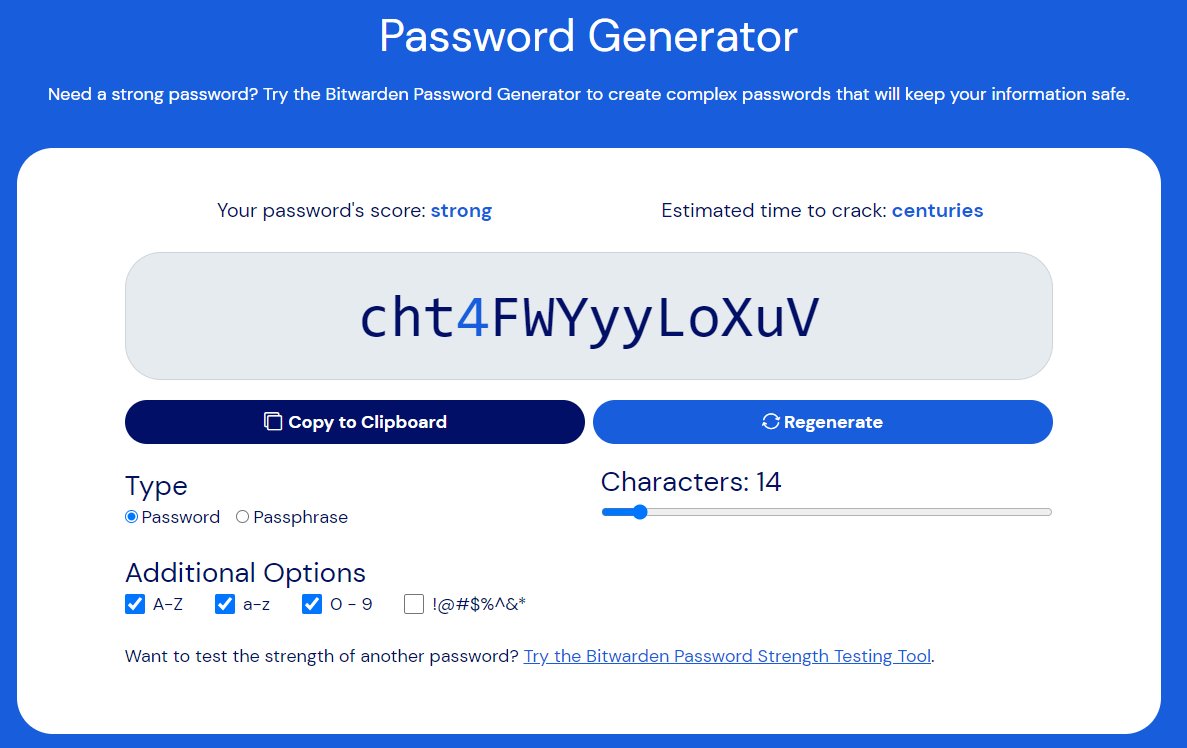
Use Strong Passwords: Make sure each account has a different password. Mix letters, numbers, and symbols to make them strong. If it's hard to keep track, a password manager like Bitwarden can help.
Turn on Two-Factor Authentication (2FA): This adds an extra check to make sure it's really you logging in. If available, use it. It usually means getting a code on your phone or email that you need to enter after your password. You can use app like Google Authenticator for this feature.
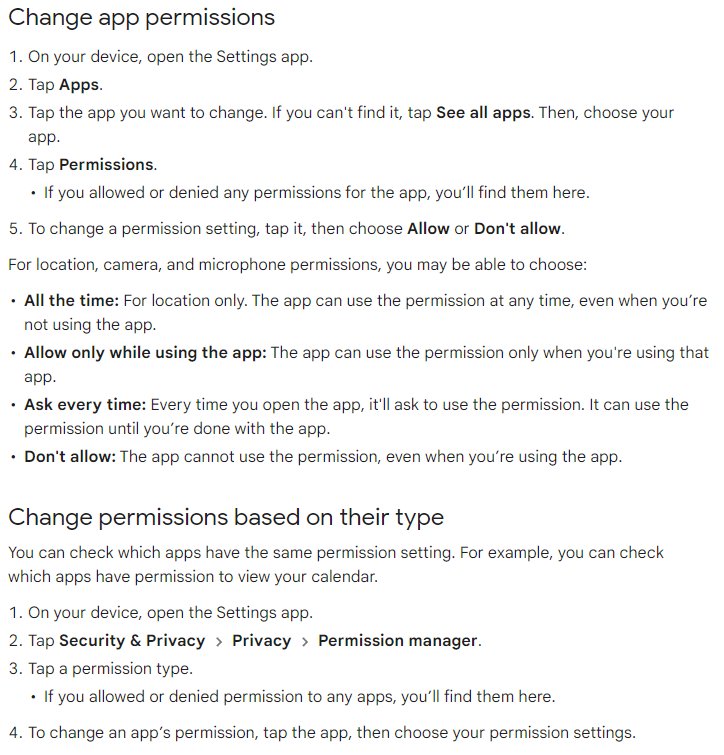
Review App Permissions
Check What Apps Can Do: Some apps ask for more access to your device than they need. Look at what permissions each app has and think, "Does this app really need this to work?"
Take Back Permissions: You can find and change these permissions in the settings of your smartphone or tablet. If an app doesn't need certain permissions to function properly, feel free to turn those permissions off.
Step 3: Clean Up No Longer Use Apps and Accounts
Identify Unused Accounts
Check Your List: Look at the list you made earlier of all your accounts and apps. Circle or mark the ones you haven't used in a long time.
Decide What Goes: Think about whether you really need each account. If you haven't used it in months or can't remember why you signed up, it's probably time to let it go.
Delete or Deactivate Accounts
Find the Delete Option: Most social media accounts have a way to close them in the account settings. This can sometimes be hard to find, but a quick web search like "How to delete my account on _____" can show you where to go.
Use Direct Links: Websites like AccountKiller.com provide direct links to delete pages of popular services, making the process easier.
Step 4: Remove Personal Information from Search Engines
Google Yourself
Start Searching: Type your name into different search engines. Try adding details like your city or job to see if different results pop up.
Spot the Sensitive Info: Look for any information you wouldn't want strangers to know, such as your home address, phone number, SSN or anything private.
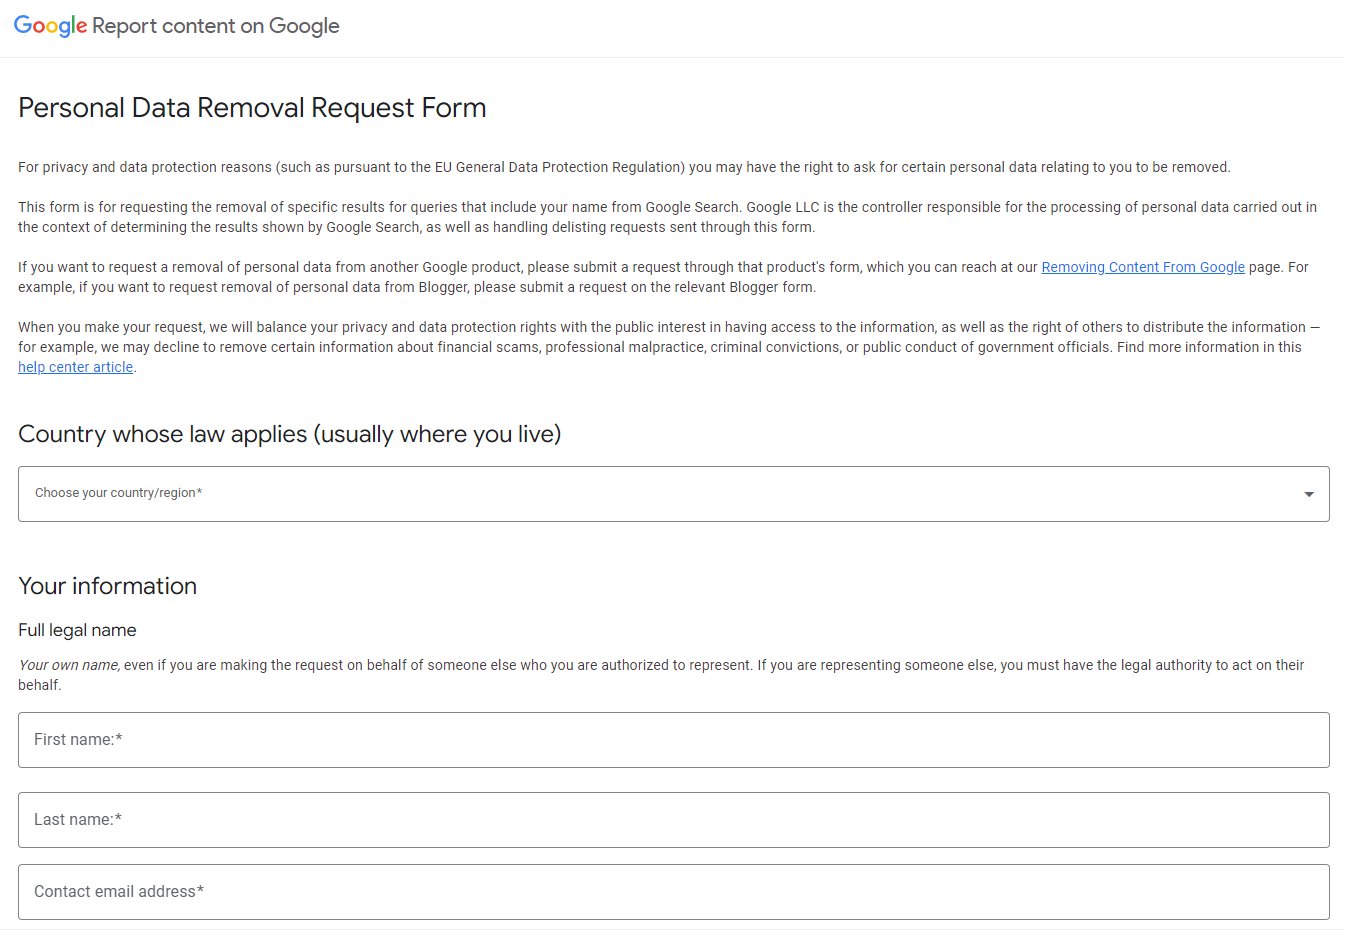
Request the Removal
Fill Out a Form: Google has a form for asking to remove personal information. Fill out a request for the necessary information needed.
Be Specific: When you fill out the form, be clear about what information you want to remove and why. Include links to the pages that show your information.
Step 5: Opt-Out of Data Broker Sites
Dealing with Data Brokers
Personal information from data brokers: Data brokers and people gather and store personal details, often selling this information to advertisers or other third parties.
Sell your information: These entities make profits by trading personal data, including sensitive payment information and browsing habits.
Collect your information: Through online activities and transactions, data brokers sell information from basic demographics to more detailed behavioral patterns.
Identify Data Brokers


Search for Your Details: Use your name and email to look yourself up on data broker sites such as Spokeo, Whitepages, or BeenVerified. These sites gather lots of information from your address to your shopping habits.
Make a List: Keep a list of sites where you find your information to data brokers. This will be your checklist for who to contact and ask them to remove your address and other personal information.
Request Removal
How to opt out:
-Click on "Do Not Sell My Personal Information" in the website’s help section.
-Search for your listing by providing your name and state.
-Find your listing, and click on “Proceed to Opt Out.”
-Enter an email address, and complete the CAPTCHA.
-Click on "Verify Opt-Out" in the confirmation email.
-Confirm your information on the confirmation page, and wait up to 24 hours for a response.
Step 6: Delete or Secure Social Media Accounts
Review Your Social Media Accounts

Make a Decision: Think about each of your social media accounts. Which ones do you use regularly? Which ones help you stay in touch with friends and family? Keep these. If there are accounts you haven’t used in months or don’t enjoy anymore, it might be time to say goodbye.
List Them Out: Write down every social media platform you have an account on, even the ones you haven’t visited in a while. This helps make sure you don’t miss any.
Adjust Privacy Settings or Delete
Tighten Privacy Settings: For the accounts you’re keeping, go into the privacy settings. Make sure you’re comfortable with who can see your posts, contact you, and how much of your profile is visible to strangers. On platforms like Facebook or Instagram, you can adjust who sees your posts, your profile information, and even who can send you friend requests.
Delete or Deactivate: If you decide an account isn’t worth keeping, look for the option to either deactivate or delete it. Deactivating usually means your profile is hidden but can be reactivated later. Deleting should remove your profile and all the information from other data associated with it, although it’s a good idea to download a copy of your data first if the platform offers that option.
Step 7: Request Personal Information Removal from Third-Party Websites
Identify Websites Holding Your Data
Start a Search: Use search engines to find where your name, email, or other personal details show up. You might find yourself mentioned on old forums, blogs you used to write for, or news articles.
Make a Note: Create a list of all the places where you found your information. This will be your guide on where to start requesting removals.
Contact Webmasters

Find the Contact Info: Most websites have a "Contact Us" page or footer links with contact information. If there's a specific page or post with your information, check for an author or webmaster’s email directly on that page.
Be Polite and Direct: When you write to them, be clear about what information you want removed and where it is on their site. It helps to be polite and explain why you’re asking for the removal. Remember, you’re more likely to get a positive response with a friendly email.
Follow Up: If you don’t hear back in a week or two, it’s okay to send a polite follow-up. Some sites might be slower to respond than others.
Step 8: Handle Identifiable Images and Maps
Review Images on Google Maps
Start Exploring: Visit Google Maps and search for your home address or any location tied to you personally. Street View and the photo section can sometimes have clear images of your house, car, or even you.
Zoom In: Pay close attention to details in these images. Can you see anything that shouldn’t be public, like license plates or recognizable features of your home?
Report The Problem: If you are sure, you can go ahead and click the Report a problem command at the right-most corner on the bottom of the page.
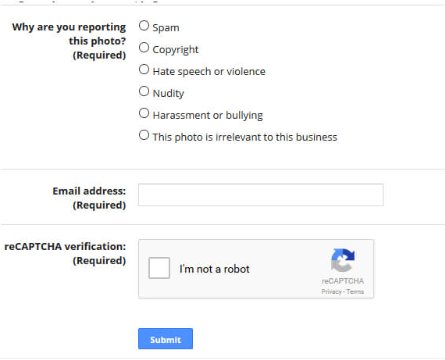
Be Specific: When you fill out the removal form, be clear about what you’re reporting and why. For example, if it’s a picture of your house, you can ask to have it blurred for privacy reasons.
Step 9: Manage Your Email Accounts
Identify Old Email Accounts
Think Back: Try to remember all the email accounts you've created over the years. This includes those you made for school, work, or just because you needed a new one.
Search Your Memory: Don’t forget about accounts linked to specific services, like shopping or gaming platforms. These often go overlooked but can hold a lot of personal information.
Delete or Clean Up
Sign In and Decide: Log into each old account. Decide if there’s anything worth saving, like emails from friends or important documents. If there is, forward these to your current account or save them elsewhere.
Find the Delete Option: Look for an option to close or delete the account in the settings. This might be under "Account Preferences" or "Security Settings." If it’s hard to find, a quick online search like “How to delete [email service] account” can guide you.
Unsubscribe from Newsletters: For the accounts you’re keeping, take a moment to unsubscribe from newsletters or updates you no longer read. Most emails have an "unsubscribe" link at the bottom.
Step 10: Optimize Browser Privacy Settings
Adjust Settings
Find Privacy Settings: Open your browser and look for the settings or options menu. This is often represented by three dots or lines in the corner of the window. Then, find the section labeled "Privacy" or "Security."
Disable Tracking: Look for an option that says something like "Prevent websites from tracking me" or "Send a 'Do Not Track' request." Turning this on tells websites you don’t want to be followed around the internet by trackers.
Enable Do-Not-Track Requests: While not all websites honor these requests, it's a good step to take. It adds an extra layer of telling sites and advertisers that you value your privacy.
Clear Cookies Regularly: Cookies are small pieces of data websites use to remember you. Clearing them out regularly helps prevent trackers from building a profile on you. Look for an option to clear your browsing data, and make sure to select "Cookies and other site data."
Step 11: Use Privacy Enhancing Tools
Install Anti-Tracking Tools


Pick Your Data Protection: Tools like uBlock Origin and Privacy Badger act like a privacy shield. They block ads and trackers from following what you do online, helping you protect your personal information and avoid being watched.
How to Install: These tools are usually available as browser extensions. This means you can add them directly to your web browser, like adding a new piece of equipment to your digital toolkit. Just visit the extension store for your browser, search for the tool, and click "Add" or "Install."
Use a Secure Browser
Choose Your Browser: Some browsers are designed with privacy in mind. Firefox and Brave, for example, offer built-in features to block trackers and ads, keeping your browsing habits private.
Make the Switch: Downloading and setting up a new browser is straightforward. Visit the browser’s website, download the installer, and follow the steps to set it up. Once installed, take a moment to explore its privacy settings and adjust them to your liking.
Step 12: Sign Up for a Data Removal Service
Look for Trustworthy Service: Start by searching for identity monitoring services with good reviews and a strong reputation. Service like MyDataRemoval can give you guarantee for a privacy protection service.
Use web to track your online activities: Be vigilant of how websites you visit and applications monitor your online behavior, and take steps to limit unnecessary data collection.
Choose MyDataRemoval for Peace of Mind: Trust MyDataRemoval to diligently work on your behalf, removing your personal information from data brokers and online platforms.
Effortless Enrollment Process: Simply reach out to us at hello@mydataremoval.com or call us at (855) 700-2914 to get started with protecting your online privacy.
Importance of Proactive Measures
- Every action contributes to the larger battle for online privacy
- Protecting data online against unauthorized selling or sharing
- Securing digital life by managing and monitoring online activities
- Google search results is relatively easy: Use Google's privacy tools to request the removal of personal information that appears in search results.
- People to request: Encourage individuals to exercise their right to ask for their data to be deleted or not collected in the first place.
- Comes to data, data could be aware that any collected data could potentially be misused, underscoring the importance of careful data sharing.
Conclusion
The internet may seem like a vast sea of data where personal information is freely traded, collected, and sold by various entities. From sensitive information like payment details to seemingly harmless browsing data, everything has value in the digital marketplace.
Companies might offer discounts or free shipping in exchange for your data, but the real cost comes to your data privacy. Thankfully, it's possible to remove personal information from Google search results and other online spaces, safeguarding your digital footprint against data breaches and unwanted scrutiny.
Taking proactive steps to delete your personal information, asking companies and data brokers to remove your details, and using a data removal service like us can make a significant difference.
While the task of having your information removed from the internet and protecting your digital identity might seem daunting, tools and services available today make this goal attainable. Regularly auditing your online presence, staying informed about new data privacy practices, and adopting secure online habits can help maintain your privacy over time.
Email us at hello@mydataremoval.com or give us a call at (855) 700-2914 so we can take the steps necessary to protect your information, enhance your online security, and respond effectively to any threats you may be facing. Your privacy and peace of mind are our top priorities. Let's tackle these challenges together.